Editing recordings
As a teacher you can edit the recordings yourself. See also the instructional videos on the page Instructions Video platform of the video platform.
Metadata
If you click on the "Edit" button you will immediately arrive at a screen where you can enter all metadata:
- Publish - only when this is checked will students be able to see the recording
- The name - preferably numbered so that you can see in which order they should be viewed.
- The location - this is normally already correct: the course folder (to change this, see below under "Move to another folder")
- The language - for possible subtitles
- The thumbnail/thumbnail image - for this you can choose the title page of your ppt as follows:
- Choose "Select an image from the video"
- Click on the correct slide. If there are no slides, you must first have them detected in the "Slides" tab (see instruction video UU).
- Click "Save changes".
- The change is not yet visible, press Ctrl+Shift+R at the same time.
- The teacher/speaker - Click successively on:
- Add speaker - enter the last name or the SolisID (combination first name + last name cannot be found by this search engine)
- Search speakers - select the right teacher
- Validate
- Saving Changes.
Editing video sources after recording in lecture hall
A recording in a lecture hall is always made with multiple video sources available. It is possible to switch between these sources when viewing the recording.
These switchable windows can be adjusted in the video platform. Follow the steps given below, or watch the UU video.
A recording with multiple sources is saved in one video: the sources are placed next to each other in the same image. Windows can be specified in the video platform in which part of this image is shown. By default, each source already has its own window in the displayed image (A B C D E in image). Each window can be adjusted in size and location, and can also be deleted if desired.

To adjust a source in the image or make it no longer visible, its window in the display must be adjusted via the 'Player Settings'. A deleted resource can always be added back later.
Method:
- In 'Player Settings', select the window to be edited.
- Select the window to edit: red squares will appear around this window.
- Adjust: drag these red squares at the bottom center or to the right to the side until you have the correct crop, or use the squares on the corners to enlarge/reduce the source
- Move: Drag the entire image to the desired location
- To delete:
- Right-click on this window to reveal the window options (see window A in the figure). (Preferably use Google Chrome. It may happen that the browser you use to view the recording also opens its own window when using the right mouse. Try to work around that.)
- Choose the option "Delete"
- Don't forget to save the recording afterwards!
You can add a window in the same screen by using the + button at the top left, which will cause a new window to appear with the entire recording. Then edit it according to the steps mentioned above.
Trimming videos
You can delete the beginning and end of the video and also edit parts (pauses, slips of the tongue). Keep in mind that a new video will be created and the link to the video will change.
When trimming you can select different parts from a video. These are stitched together in the resulting video, which is how you edit out bits.
If you want to split a video into two parts, you need to do a trim action for each part.
Giving rights to users
The recordings can be viewed by all faculty employees and students. However, there may be LAS students in the course. In this video you will see how to give access to everyone with a SolisID.
Move to other folder
Recordings you make at home or at work end up in your personal folder.
This video shows you how to move it to the course folder so that your students can access it and everything is together.
Download video
It is sometimes necessary to download the recording, for example to make complex edits or to put it on YouTube or FeedbackFruits.
In this clip you can see where you can find the download link. If the video plays as at the end of the clip, you can right-click on it and download the video.
NB: the quality/resolution of the download is not always as high as that of the original.
Edit source after uploading
An example of a Teams recording with 2 speakers. This is uploaded as one MP4, and is split into 3 different video channels: 1x presentation and 2x presenters.
With Teams recordings, you must be aware that the position of the presenters can change. If that happens, the recording will need to be edited with another program to keep it in the same place - and CPIO can do that for you.
Editing sources on a regular recording is discussed below.
Copying recordings
You do this by cutting videos, but not editing out any parts. A new (identical) video will then be added to the channel. This can then be moved to another folder if desired.
Add questions
It is possible to add all kinds of activities to a video. You do NOT do this in Edit mode, but while watching the video.
You can make the activity mandatory, and also pause the video until the answer is answered.
Possible activities are:
- a link, embedded or not
- a question
- an evaluation question
There are several options to add questions.
- You can add a link as an activity, which links to a Xerte module (with 1 or more questions)
- Add questions with a link to Wooclap to the video (link to English page)
- As an activity you can add a Questionnaire with one or more questions
Add questions as Questionnaire:
- Click on the icon for Timeline.

- Play the video until the moment you want to ask the question (or other activity)
- Click the + at the bottom left to add an activity to the timeline.
- Choose the desired activity, for example Polls/Questionnaires.
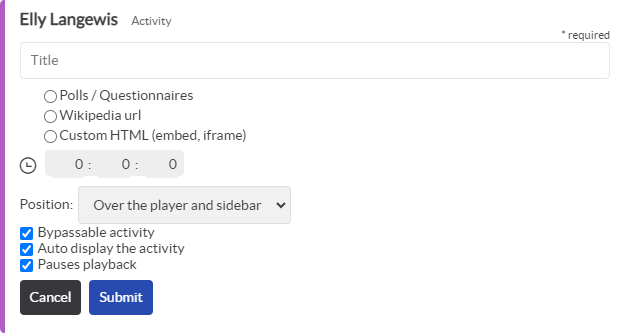
- You now get an overview of available polls and questionnaires. Click on "Manage" at the bottom of the overview to add a new question
- Under "Add an activity" (top) choose Questionnaire
- You can then give a name to the Questionnaire, and then add multiple questions. You can also add one question if you only want to ask one question at this point in the video.
You can ask one of many questions or an open-ended question. For the closed questions you can define feedback for each answer option.
