Tracking in Xerte: Difference between revisions
Jump to navigation
Jump to search
| Line 8: | Line 8: | ||
This is how: | This is how: | ||
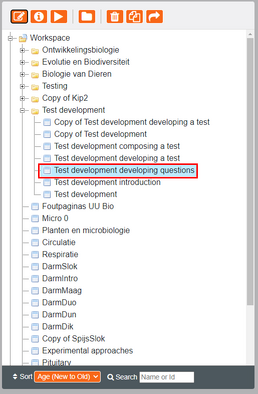
# Click on the module you would like to track in Xerte:<br>[[File:1 Click.png]] | # Click on the module you would like to track in Xerte:<br>[[File:1 Click.png|258px]] | ||
# Click on the ‘project properties’ / ‘eigenschappen leerobject’ button:<br>[[File:Project properties.png]] | # Click on the ‘project properties’ / ‘eigenschappen leerobject’ button:<br>[[File:Project properties.png]] | ||
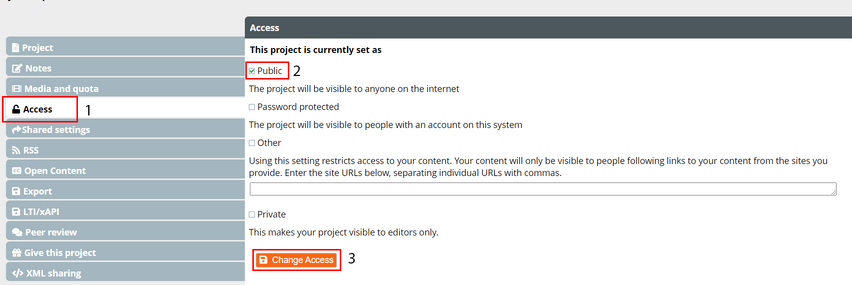
# Make sure that the access (1) of the module is not private but published for example to make the access ‘public’ (2). Don’t forget to click ‘change access’ (3).<br>[[File:2 access.png]] | # Make sure that the access (1) of the module is not private but published for example to make the access ‘public’ (2). Don’t forget to click ‘change access’ (3).<br>[[File:2 access.png|852px]] | ||
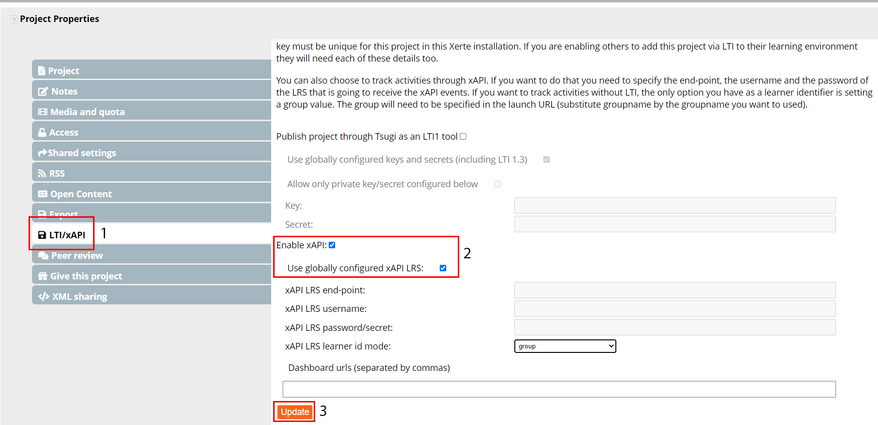
# Click on ‘LTI/xAPI’ (1). Enable xApi & use globally configured xAPI LRS (2). Don’t forget to click update (3).<br>[[File:3 LTI.png]] | # Click on ‘LTI/xAPI’ (1). Enable xApi & use globally configured xAPI LRS (2). Don’t forget to click update (3).<br>[[File:3 LTI.png|878px]] | ||
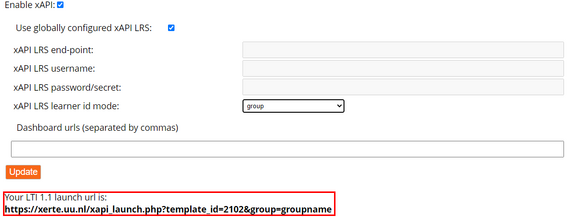
# After enabling the xAPI, the link of the module which is tracked, is shown at the bottom of the page. De link is also shown in the project details as shown in step 7.<br>[[File:4 link.png]] | # After enabling the xAPI, the link of the module which is tracked, is shown at the bottom of the page. De link is also shown in the project details as shown in step 7.<br>[[File:4 link.png|588px]] | ||
# To track the separate pages of the Xerte module, you have to add tracking to the separate pages by editing the module:<br>[[File:Edit.png]]<br>After that, add the tracking option in the optional properties to all the pages you want tracked:<br>[[File:5Optional properties.png]]<br>After adding the tracking option, you are able to fill in the following boxes:<br>[[File:Tracking.png]]<br>Fill in the tracking label with the name of the page and if necessary the tracking grouping (read in the i what it means to group the tracking). | # To track the separate pages of the Xerte module, you have to add tracking to the separate pages by editing the module:<br>[[File:Edit.png]]<br>After that, add the tracking option in the optional properties to all the pages you want tracked:<br>[[File:5Optional properties.png|123px]]<br>After adding the tracking option, you are able to fill in the following boxes:<br>[[File:Tracking.png|680]]<br>Fill in the tracking label with the name of the page and if necessary the tracking grouping (read in the i what it means to group the tracking). | ||
# After adding the tracking option to all the pages you want tracked, you can see the results of the tracking (2) from the project details and the link of the tracked Xerte module (1).<br>If you click on the graph, the dashboard becomes visible:<br>[[File:6 project details.png]]<br>Here you can click on multiple things to see the results of the tracking. | # After adding the tracking option to all the pages you want tracked, you can see the results of the tracking (2) from the project details and the link of the tracked Xerte module (1).<br>If you click on the graph, the dashboard becomes visible:<br>[[File:6 project details.png]]<br>Here you can click on multiple things to see the results of the tracking. | ||
[[File:Dashboard.png | [[File:Dashboard.png|alt=Tracking dashboard|Tracking dashboard]] | ||
Now you can track your modules. | Now you can track your modules. | ||
If you have questions, sent an e-mail to cpio@uu.nl to get help and tips. | If you have questions, sent an e-mail to cpio@uu.nl to get help and tips. | ||
Revision as of 13:23, 23 August 2023
Tracking in an existing Xerte module
This way you can track
- how many times you Xerte module is opened
- how long students spent on the different pages
- the results of Xerte modules
This is how:
- Click on the module you would like to track in Xerte:
- Click on the ‘project properties’ / ‘eigenschappen leerobject’ button:

- Make sure that the access (1) of the module is not private but published for example to make the access ‘public’ (2). Don’t forget to click ‘change access’ (3).
- Click on ‘LTI/xAPI’ (1). Enable xApi & use globally configured xAPI LRS (2). Don’t forget to click update (3).
- After enabling the xAPI, the link of the module which is tracked, is shown at the bottom of the page. De link is also shown in the project details as shown in step 7.
- To track the separate pages of the Xerte module, you have to add tracking to the separate pages by editing the module:

After that, add the tracking option in the optional properties to all the pages you want tracked: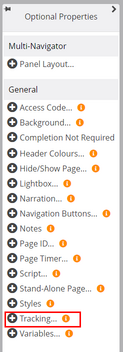
After adding the tracking option, you are able to fill in the following boxes:
Fill in the tracking label with the name of the page and if necessary the tracking grouping (read in the i what it means to group the tracking). - After adding the tracking option to all the pages you want tracked, you can see the results of the tracking (2) from the project details and the link of the tracked Xerte module (1).
If you click on the graph, the dashboard becomes visible: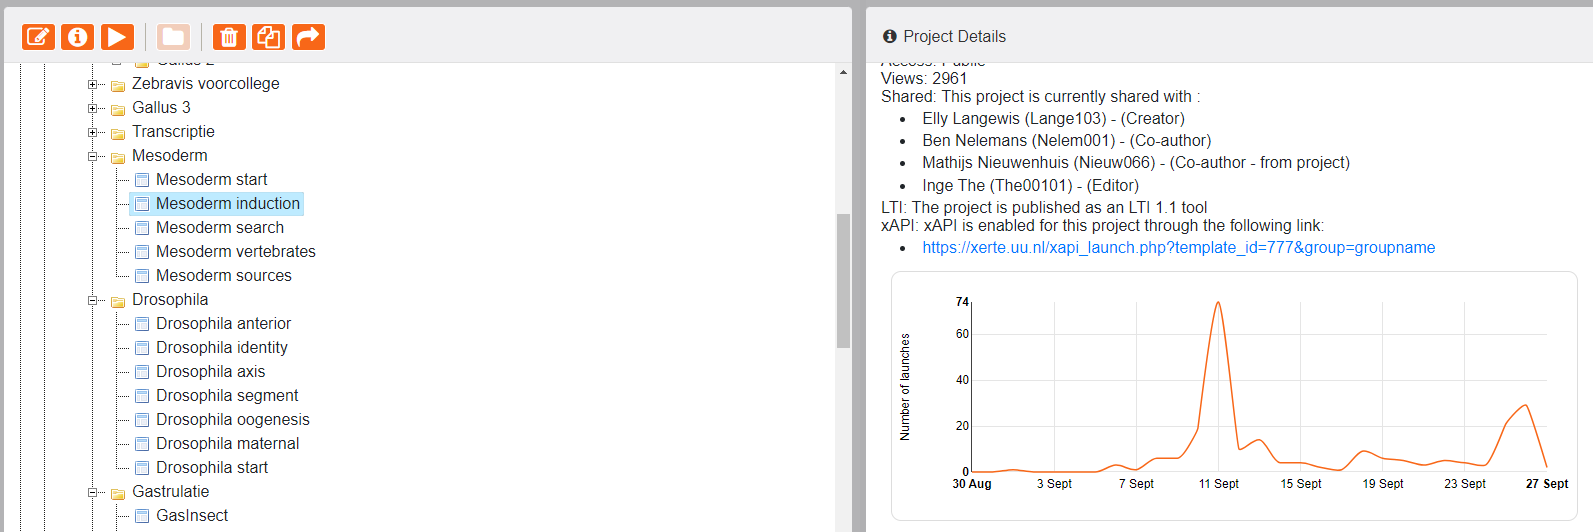
Here you can click on multiple things to see the results of the tracking.


Now you can track your modules.
If you have questions, sent an e-mail to cpio@uu.nl to get help and tips.